Home|Glossary|Links|Journal|Maps
Snow city
The
radio training and survival scenarios took place during the first
half of Saturday, but we had arrived at camp early the day before.
Helicopter
Safety
Our helicopter safety training
can be summed up as follows:
- Only approach a helicopter
from the front in full view of the pilot. Helicopter tails contain a small stabilization
rotor that's not easily seen and because of that can be very
dangerous.
- Carry all skis or equipment that is long horizontally not
vertically. Otherwise your gear could get caught in the propeller
on top of the helicopter and that would be bad.
- Only approach a helicopter from the front in full view of
the pilot. Otherwise a helicopter technician may have to run
up and tackle you so you don't get too close to the rear rotor.
- When a helicopter is taking off or landing near you, don't
look at it. You might get a blast of dirt particles in your
eyes.
- Did we mention? - only approach a helicopter from the front
in full view of the pilot.
|
The vast majority of our time
had been spent building our very own snow city, complete with four
different kinds of shelters.
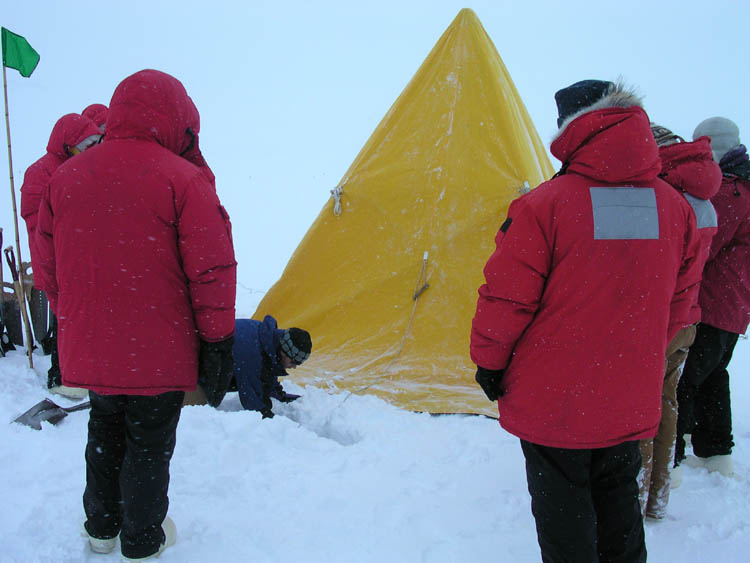
The Scott Polar tent is the traditional polar exploration tent.
When erected, it looks like a little pyramid. Designed for two people,
the tents can, in an emergency, accommodate four. Since they are packed
pretty much assembled, the tents can be set up in a short amount of
time. They're secure in very strong winds. You can stand up in them.
A top vent even allows you to safely cook in them. And their bright
yellow color makes them not only visible but downright cheery. Their
main problem is that at 80 pounds each, they're not always the shelter
you want to lug along.
 Putting up
a Scott Polar Tent
Putting up
a Scott Polar Tent |
 Burrying an
anchor for the Scott Polar Tent
Burrying an
anchor for the Scott Polar Tent |
Mountain tents in contrast weigh
somewhere around 10 pounds and take up less space. They're more time
consuming to erect, however. And you can't stand or safely cook in
them. They're also not as capable of handling strong winds. But if
you have a shovel and a saw handy, you can do something about that
latter problem - make a snow wall to block the wind.

Start of snow cave |
 Making the
snow cave
Making the
snow cave |

Snow block quarry |
The dry snow that blankets much of
Antarctica doesn't make good snowballs, but it's excellent for making
snow blocks. First you have to identify a quarry site and mark block
outlines. Then you saw into the snow and use the shovel to pry the
blocks out so that you can carry them to your tent site. It works
best if all the blocks are roughly the same size and are laid out
in brick like fashion.
A quarry site can also be easily turned
into another kind of shelter, a snow trench. If you're in an
emergency situation and you don't have a tent handy, a trench is the
most basic survival shelter. Its construction is simple and it doesn't
take a lot of time to make one. Instead of transferring the blocks
you dig to a tent site, you pile them up around the trench you create.
You can dig out more blocks to make a roof.
 Guy outside
his
Guy outside
his
snow trench
|
IGLOOS
Igloos are perhaps the best known snow
structure. Made by stacking snow blocks in a continuing
spiral toward the center, they are warm and roomy.
They are also much more time consuming to build and
wouldn't be appropriate in an emergency situation.
So
our instructors didn't teach us to make them.
|
|

Gordon wonders,
"Where's the cable TV?" |
Next>>